Microsoft SQL Server 2014 Enterprise Edition
Hardware Requirements
Processor:- On 32-bit platforms, SQL Server 2014 requires a Pentium III or faster processor una 1.0 Ghz speed or better. On 64-bit platforms, SQL Server 2014 requires Intel Xeon, AMD Opteron or Athlon 64 with a minimum speed of 2.0 Ghz.
RAM:- 512 MB minimum of RAM for Express Edition, but the minimum for all other editions is 1 GB of RAM (the minimum is 2 GB if Data Quality Services is going to be installed). Recommended amount of RAM for Express Edition is 1 GB of RAM, but the recommended amount of RAM for all other editions is 4 GB of RAM.
Operating Systems Requirements
Plan to install on a NTFS file system.
Do no try to install SQL Server 2014 on a compressed, encrypted or read-only drive, because setup will block the installation.
Do not install SQL Server on a Domain Controller.
Verify Windows Management Instrumentation service (Control Panel -> Administrative Tools -> Services) is running.
Configure your firewall to allow SQL Server access.
The user account that is running SQL Server Setup must have administrative privileges on the computer.
It can be installed on Windows Server 2012 R2, Windows Server 2012, Windows Server 2008 R2 Service Pack 1 (SP1), Windows Server 2008 Service Pack 2 (SP2), Windows 8.1, Windows 8, Windows 7 Service Pack 1 (SP1).
The following operating systems are not supported: Windows Vista, Windows XP, Windows Server 2003 and Windows Server 2000.
At least 6.0 GB of disk space are required by SQL Server setup.
Additional software requirements and hardware requirements:
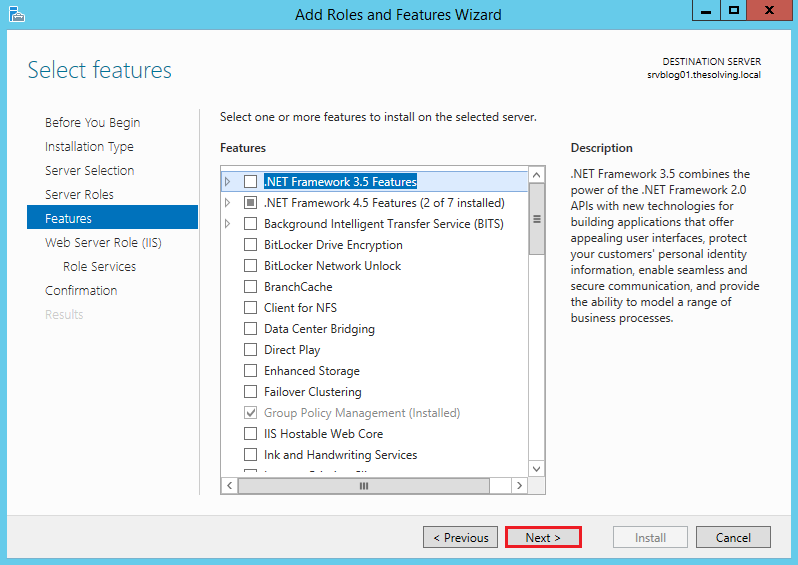
Enable .NET Framework 3.5.
SQL Server includes .NET Framework 4.0 and will install it .NET Framework 4.0. Express Edition will download it from the Internet.
PowerShell 2.0.
Run SQL Server 2014 setup.


On the screen above, make a click on the "Installation" hyperlink in the left side of the screen.
This screen shows the types of installation available. Let's select the first type available "New SQL Server stand-alone installation or add features to an existing installation".

On the page above, specify the edition of SQL Server to install, if you are choosing to install a free edition of SQL Server 2014 or an Evaluation Edition of SQL Server 2014.
You should also provide a product key, if you are installing a licensed edition of SQL Server. Sometimes the product key is included in the media (the product key is pre-pidded).
You should also provide a product key, if you are installing a licensed edition of SQL Server. Sometimes the product key is included in the media (the product key is pre-pidded).

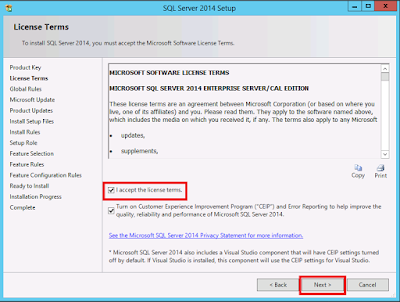
The above is the License Terms page. Read the license agreement and if you agree with it, check the "I accept the license terms" check box, and then click the Next button.

On this page SQL Server 2014 setup is trying to get updates from Microsoft Update, and for this reason is important to have Internet access when installing SQL Server as mentioned at the beginning of this article. Make a click on the checkbox to get the updates, if the computer has Internet access, then click on the Next button.

The above screens belong to the second set of Setup Support Rules. To have detailed information about the cause of errors and warnings you may receive click on the blue hyperlinks associated with each warning/error.

About the Windows Firewall warning, you can go ahead with the installation of SQL Server, but when it finishes configure your Windows Firewall to allow SQL Server access or disable it.

If you receive the Microsoft .NET Application Security warning is because Setup Support Rules verifies Internet connectivity and triggers a warning if there is no Internet connection. The reason to check for Internet connection is "because .NET always tries to connect to CRL.MICROSOFT.COM on startup to check signature validation.
In general, warnings won't prevent you from install SQL Server server.


On the SQL Server Setup page shown above, you can decide to install specific features of SQL Server or decide to install SQL Server using a setup role

On the Feature Selection page, please select the features you would like to install. A description of each feature will appear on the "Feature description" area when you click on a feature.

Once you have selected the features to install, please click on the "Next" button.

On the Instance Configuration page, select a default or named instance for your installation. SQL Server supports multiple installations on the same computer, each installation receives the name of "instance". The default instance gets the name of the computer, but the named instances, receive the name of the computer plus the name provided by the user on this setup page. To access a default instance once it is installed, using SQL Server Management Studio or any other program, you just need provide the computer name. To access a named instance, you will need to provide the name opf the instance in the forma of computername\nameoftheinstance.

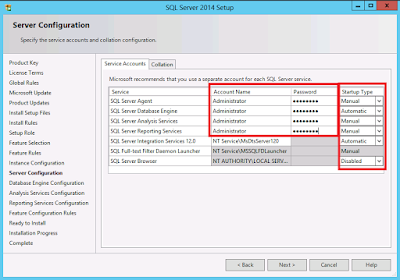
On this screen you need to provide the service accounts that SQL Server services will use. As you can notice, SQL Server setup provides virtual accounts by default, they are auto-managed, they can access the network on a domain environment by using the credentials of the computer account.
However, I still recommend to create a local user or use a domain user account to start SQLServer services.
If the computer is not part of a domain, use a local user account without Windows administrator permissions. You can create this account using Control Panel -> User Accounts. Please provide a strong password to this account since SQL Server setup will required it on this "Server Configuration" page.
Use a Domain User Account if the service must interact with network services or access domain resources. This account should be pre-created by a domain administration in your environment.
Whether you create a local user or a domain user account, the password you use to create the account must be a strong password since SQL Server setup will required it on this "Server Configuration" page.
You can also use built-in accounts (the Network Service account, Local Service, Local System) as service accounts. However, I would not recommend to use Local Service Account for SQL Server (MSSQLSERVER). Use Local System if you need a very high-privileged account, or you are having issues installing SQL Server using virtual accounts as service accounts. It has extensive privileges on the local system.
Microsoft recommends you to specify an individual account for each service. The service accounts used for this configuration must have a strong password as mentioned above, otherwise you will get the error "Invalid or missing username or password. To continue, provide valid credentials for the SQL Server Agent service". A strong password is one that has a combination of letters in uppercase, lowercase, numbers and special characters.
To provide a local Windows account or a domain account as service account, please follow the steps shown in the images below.

Change the location to Active Directory if you would like to provide a domain account as service account. Click on the "Locations" button to change the focus of the search to the Active Directory. Once you provide an account, please validate the account by making a click on the "Check Names". If the validation fails, remove the user you typed, then click on the "Advanced" button, and click on Find to get a list of Windows users and select one.

On the "Server Configuration" page you can also select how you want to start this service on the computer (Startup Type). On my laptops I usually set the services to start manually, to allow the computer to startup faster. However, on a server production environment, probably automatic should be the recommended startup type.

If you receive the below error message ("There are validations errors on this page"), probably you did not provide a strong password, the password does not match with password the account has on Windows or on Active Directory. If you cannot get rid of this message, change the service account specified at the bottom of the page (with the red balloon) to Local System my work.


On the Database Engine Configuration page (see above), choose the authentication mode to use for your SQL Server installation. If you select Mixed Mode, Setup creates an sa account.
Enter and confirm the password for the (sa) login when you choose Mixed Mode Authentication.
Enter and confirm the password for the (sa) login when you choose Mixed Mode Authentication.
You will get the error "Missing system administrator account. To continue, provide at least one Windows account to provision ...", if you fail to provide SQL Server administrators and try to continue with the next page of Setup. The error message "There are validation errors on this page ..." will also appear. Click the buttons "AddCurrent User" or "Add ..." to provide at least one account that will have unrestricted access to the SQL Server instance.

Click on the "Data Directories" tab (above image), to change the location of SQL Server default directories.

Use this page to enable FileStream on this instance. To enable it, select "Enable FILESTREAM for Transact-SQL access".
Select "Enable FILESTREAM for file I/O streaming access" to enable Win32 streaming access for FileStream.
On the "Windows share name" text box, to enter the name of the Windows share in which the FileStream data will be stored.
On the "Windows share name" text box, to enter the name of the Windows share in which the FileStream data will be stored.
Select "Allow remote clients to have streaming access to FILESTREAM data" to allow remote clients to access this FileStream data on this server.

On the "Analysis Services Configuration Page", please select "Install Analysis Services in Multidimensional and Data Mining Mode" to install Analysis Services with support for online analytical processing databases and data mining models.
Select "Tabular Mode" to install Analysis Services with support for tabular models.
Each mode is exclusive of the other.
Select "Tabular Mode" to install Analysis Services with support for tabular models.
Each mode is exclusive of the other.
Please provide also a user account that will be an Analysis Services administrator.

On the Reporting Services Configuration page (above), choose to install Reporting Services on Native Mode or SharePoint Integrated Mode.

On the Ready to Install page, review the summary of features and components for your SQL Server installation. To proceed, click Install.


On the "Complete" page (above image), you can view the Setup summary log by clicking the blue link provided on the bootom this page. To exit the SQL Server Installation Wizard, click Close.

Go to the Start menu, and choose SQL Server 2014 Management Studio (SSMS), to connect to the newly created instance of SQL Server 2014. This tool will allow you to further configure the SQL Server instance, create and manage databases, create jobs, create and run queries, and many other tasks.
If you cannot see it on the Start Menu is maybe because you did not select to install the "Management Tools" feature of SQL Server or because you just installed SQL Server 2014 Express Edition and not a licensed edition of SQL Server. However, you still can download and install SQL Server 2014 Management Studio Express from Microsoft Downloads.
The following splash screen may appear while SSMS is opening.

To access a default instance once it is installed, using SQL Server Management Studio, you just need provide the computer name on the "Server name" field of the dialog shown above. To access a named instance, you will need to provide the name of the instance in the forma of computername\nameoftheinstance.