Wednesday, December 18, 2024

Vicidial Go-Autodial 3.3 Complete Step by Step

 Vicidial  Go-Autodial 3.3 Complete Step by Step
Download Gautodial 3.3 ISO and Install File


Type Setup command on putty and configure IP's for server


When you are done installation you need to run command to update server IP in Database.
You can login with password that you setup during installation process.
root
vicidial


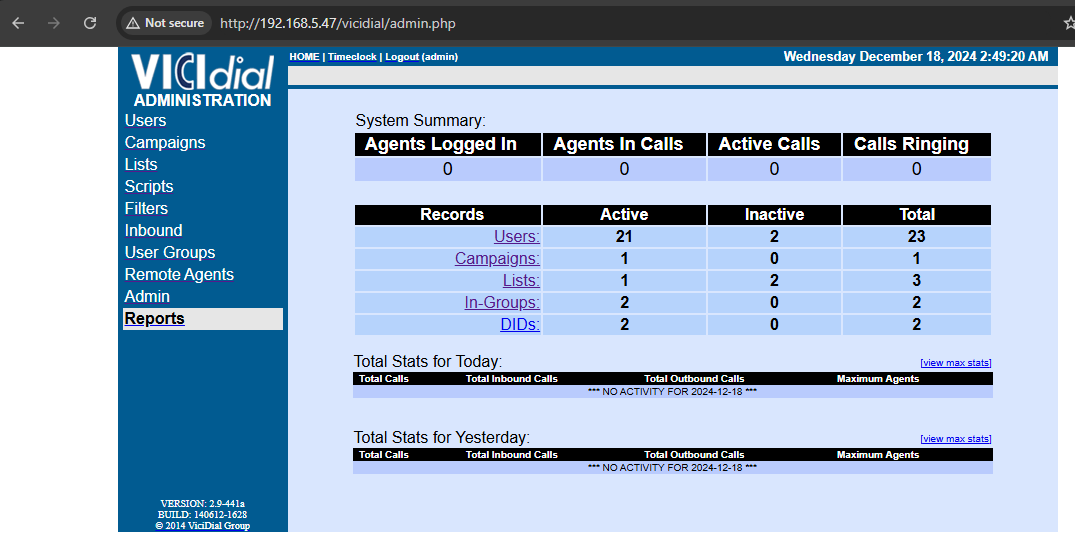
http://192.168.5.47/vicidial/admin.php
admin 
vicidialnow


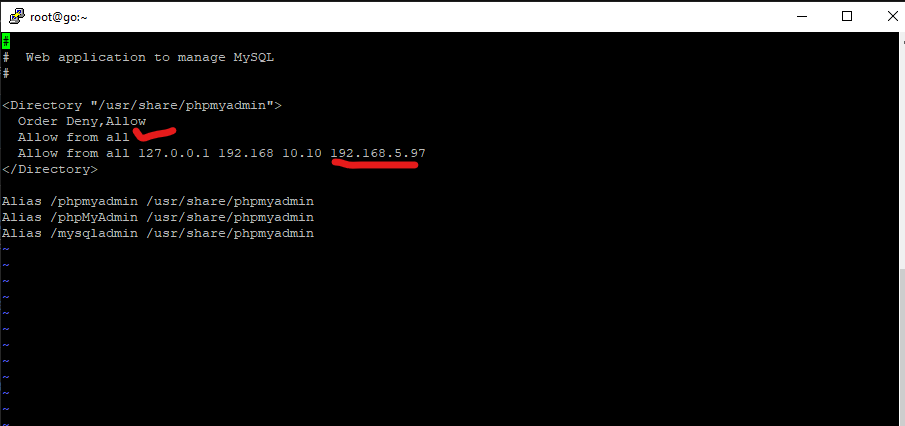
You can access phpmyadmin you need to allow from.
vi /etc/httpd/conf.d/phpmyadmin.conf    - Then enter your IP to access it.


PHP My Admin wested time due to link
http://192.168.5.47/phpMyAdmin/index.php

root
vicidialnow


Linux Cli you can acces database
mysql -p
password vicidialnow
USE asterisk;   --------- select database
below command use to change vicidial user password login and phone

update vicidial_users set pass='password123',phone_pass='password123' where user_level=1;

update phones set conf_secret='password123',pass='password123' where 1;

2. Webmin config for GUI access
Webmin conf file under vi /etc/webmin/miniserv.conf
Change ssl= from 1 to 0 for http


http://192.168.5.47:10000/
root
vicidial


3.
limesurvey
http://192.168.5.47/limesurvey/admin/admin.php
admin
kamote1234


Sunday, December 8, 2024

Mikrotik --> Site To Site Connectivity using L2TP

You should have Static Public IP  addr for both side.

Lets Start From Main Site A or Head office where you have all servers.

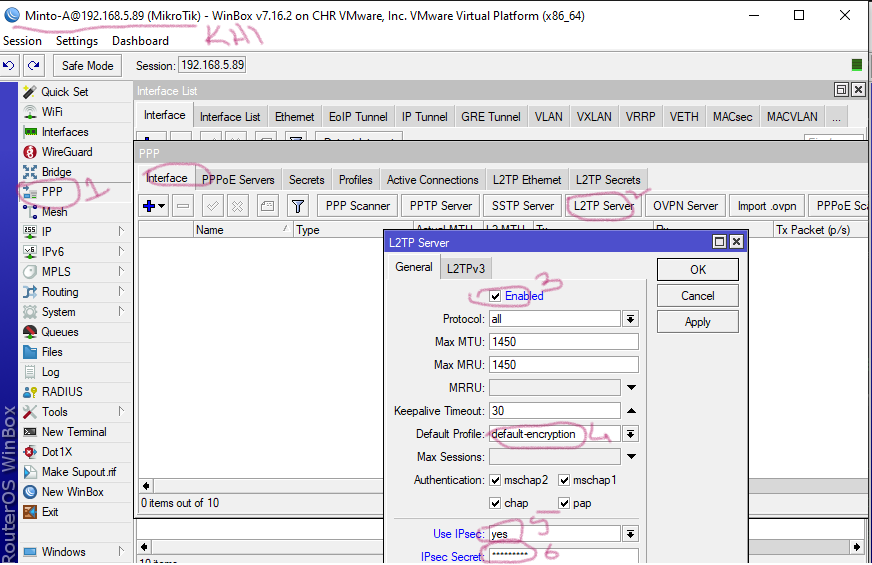
1.PPP --> Interface --> L2TP Server - ( Enable YEs - Use IPsec Yes - IPsec secret Password - ) apply ok


2.PPP --> Profile --> Default encryption -->(USE Encryption yes - Limits only one no -)


3.PPP --> Secret --> (Name = username, password = your password, service = l2tp, profile = default encryption, local add = your site local ip, remote add = other site local address,) apply ok.


4.IP -->  Route --> Plus sign -> (Dst. add: = You have to add other site IP and network address for example (Dst addr: 192.198.0.1/24 Gateway = 192.168.0.1) ok apply 


5. Let's Move to Other site Mikrotik Configuration.
Site B
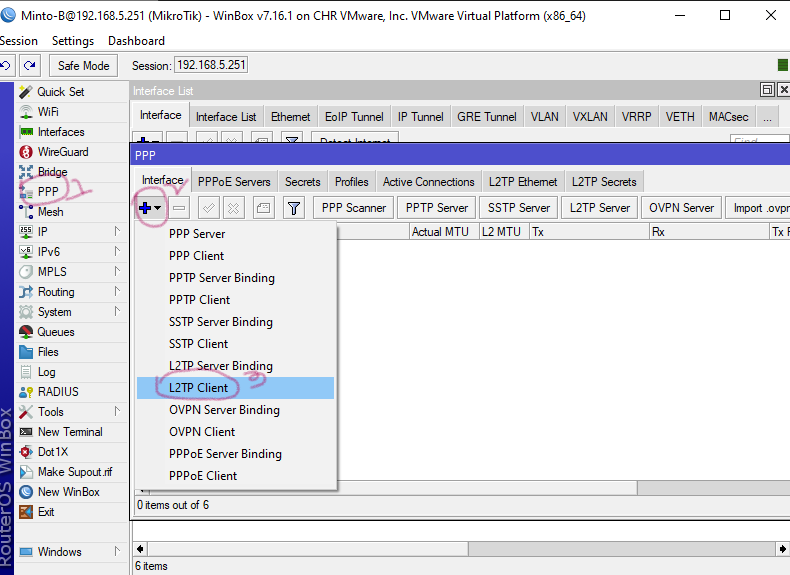
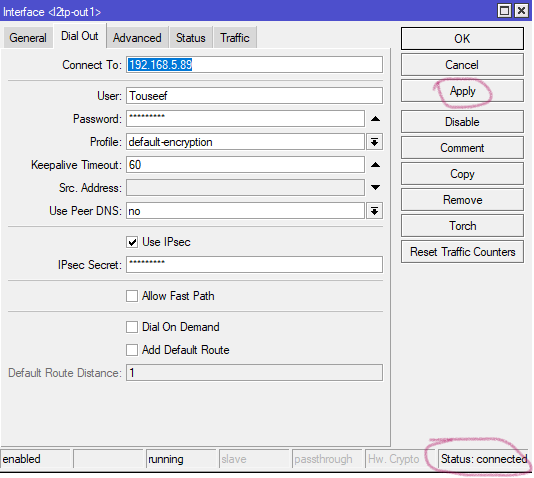
PPP --> Interafce --> plus sign --> L2tp Client (Dial out , connect to = First(other) site IP, User/pass = that was created in first(other) site under screts, profile = default encryption,
check mark use IPsec, IPsec Secret = password that was setup in first(other) site under l2tp server,) apply ok
interafce-- select your VPN -- dial out At the botton check status should be = connected


6.IP -->  Route --> Plus sign -> (Dst. add: = You have to add other site IP and network address for example (Dst addr: 192.198.1.1/24 Gateway = 192.168.1.1) ok apply


7. you can try ping and share resource from both end


Wednesday, December 4, 2024

Firewall Concepts and Firewall Rule understanding

 `Firewall --> Rules of firewall and direction of firewall is very important to manage any firewall. Three rules available for fire wall Filter rule, NAT, Mangle

1. Filter Rule --> When we try to allow/deny web traffic, SSH, Download, Telnet or want to block specific ip, pool we need to setup Filter Rule. 

NAT --> 


Direction of Firewall -- > INPUT  , OUTPUT , FORWARDING

1. INPUT --> Means traffic coming from towards/terminating at firewall

2. OUTPUT--> Means traffic originating from firewall and going towards client/servers

3. FORWARDING --> Means traffic going through firewall (from client to webserver)


Sunday, December 1, 2024

The Way You Secure Your Mikrotik Router

 1. First you need to check for available updates or latest version so you can have security patches too. Click System --> Packages --> Check For Updates, if you see latest verison available click Download & Install.


You can see below  It's downloading


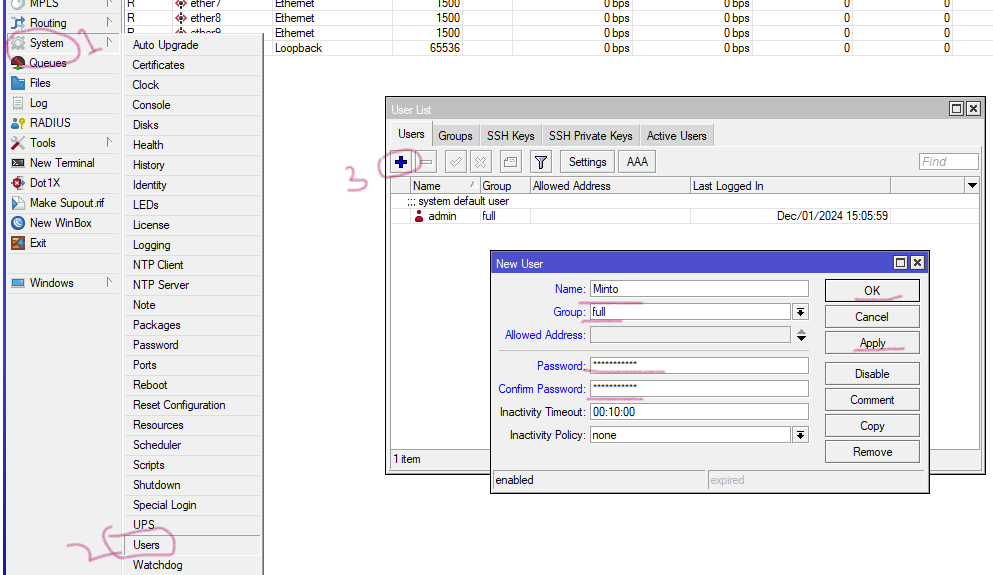
2. You need setup a different Username and password other than admin. Don't use command words in User/password always include capital/small words, special characters
Click Systems --> Users --> Plus sign from window, then fill Name(Username ), Group(Full), Password. apply ok.


Logout/ login with new User and see if it works


Now, You can disable admin user.


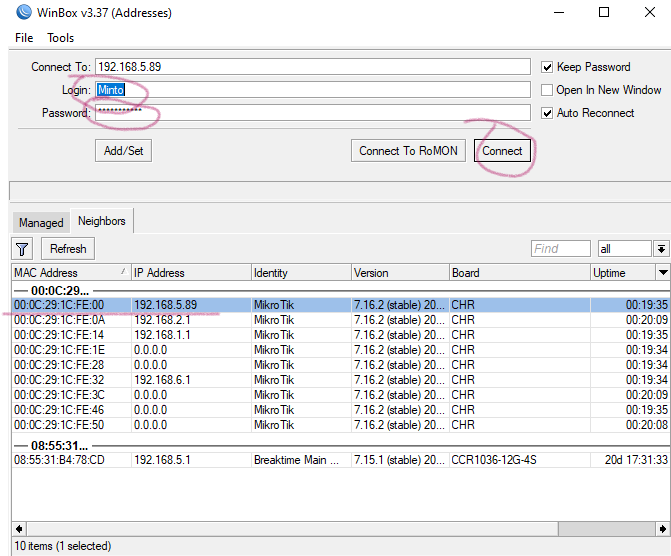
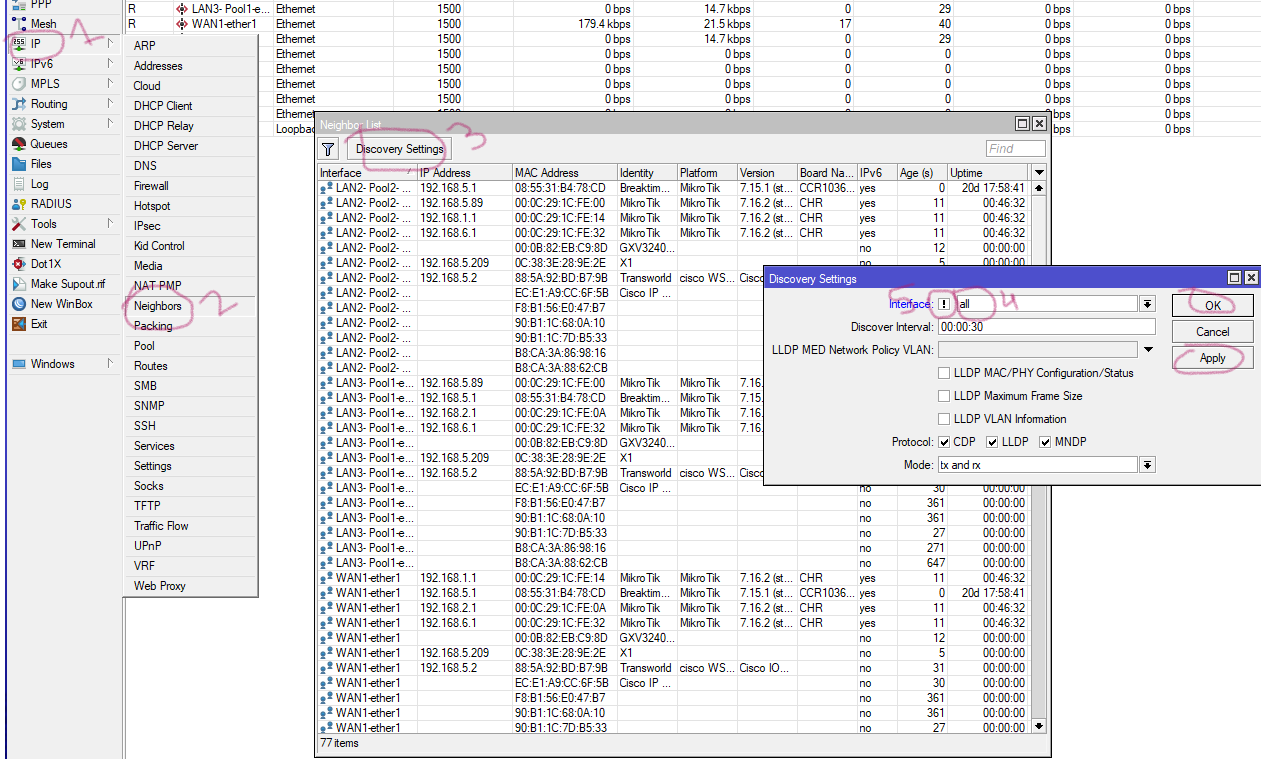
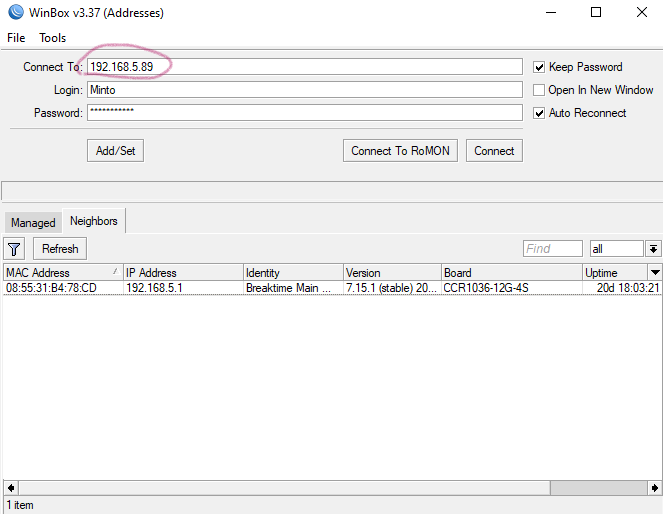
3. Third step to disable neighbor discover, like when you open winbox it shows all mikrotik it,s os veriosn ip address etc. Select IP--> Neighbors --> Discovery Settings, then select all from interface, chek mark small box. apply ok


You will see effect like below. 192.168.5.89 is not available in winbox


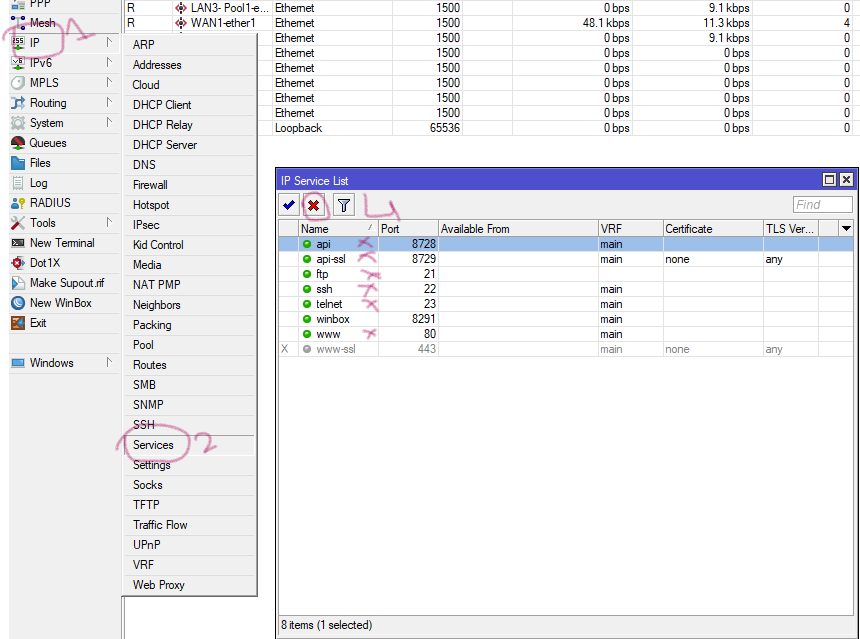
4. Step four disable unnecessary service. IP --> Services  choose and disable, api provides mikrotik access on mobile, www provides access on web browser.


5. Fifth Step is to disable all unused interfaces. Click Interafce --> Ethernet, select interafce, rite click on it press disable.


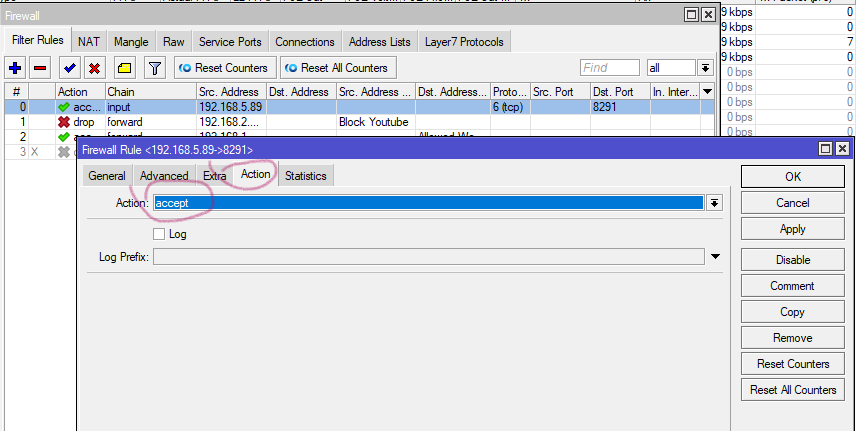
6. Allow Mikrotik access to specific IP address and deny all, it will block access weather a person know ID/password. You need to apply Filter Rules to Choose Chain (input) becasue of internal, Src addres (192.168.5.97) computer ip, Protocl (6tcp), Dst. Port(8291) winbox for mikrotik, Selection Action


Now Creat another rule to block rest all ip's in your LAN.


You need to place this rule after allowing rule becasue first match rule applies the policy.


If you want to record IP trying to login mikrotik then choose below under action


Now You are good to go with Mikrotik.

Mikrotik Firewall

1. IP -- > Firewall - you can creats all/deny wesites rules under filter rules


2. First Creat Address list in address list, click plus sign -> List name then IP address or range, hit apply ok.


3. Click Filter Rules --> Plus sign --> under genreal Chain(forward) Src. addr (192.168.2.0/24) ip or pool, Select Src. address list ( block youtube ) that created in address lists. hit ok apply


4. Drag and drop rules in appropriate order which rule which should be first match.


Mikrotik - WAN LAN Config to Access Internet

 WAN Interface

1. Select interface that you want to be WAN Interface and rename it. press apply ok

2. As you selected and renamed WAN you need to do rename LAN Interafce 


3. Select IP -> Addresses and then Plus sign from windows enter WAN-pool in ip address and select wan interafce, hit apply on.

4. Select IP -> Addresses and then Plus sign from windows enter LAN pool in ip address and select wan interafce, hit apply on.


WAN


LAN


5. Setup DNS - Press IP -> DNS and enter DNS IP


6. Setup Gateway or Route to get out traffic or gateway ip for WAN interafce. Hit IP -> Routes
Then 


.

7. Add NAT Rules to enable masqurading for ip pool, Hit  IP -> Firewall -> NAT Select Plus Sign
in general Chain should ( srcnat)  src add (192.168.1.0/24) you LAN pool, Out. Intereface WAN.
Select action and choose masqurade, hit apply ok.


Enter Lan IP manually in your computer according to define pools and see if internet work you may reboot router.