Building a Two-Node Failover Cluster
Windows Server 2012 has such a large number of new components that it's hard to monitor all of them. In any case, the absolute most critical new IT base building squares are found in the upgrades for failover bunching. Failover bunching started as an innovation that was intended to secure mission-basic applications, for example, Microsoft SQL Server and Microsoft Exchange, yet since that time failover grouping has developed into a high accessibility stage for various diverse Windows administrations and applications. Failover grouping is a piece of the establishment for Dynamic Datacenter and advances, for example, live movement. With Server 2012 and the enhancements in the new Server Message Block (SMB) 3.0 convention, failover bunching has been further extended to empower consistently accessible document offers. For a diagram of the all elements in Server 2012 failover grouping, you can look at "New Features of Windows Server 2012 Failover Clustering."
I'll demonstrate to you generally accepted methods to assemble a two-hub Server 2012 failover bunch. To start with, I'll cover some the essentials and give you a review of how the equipment environment, system, and capacity are set up. At that point, I'll plunge into the subtle elements of how to add the Failover Clustering highlight to Server 2012 and use Failover Cluster Manager to design a two-hub bunch.
Understanding the Failover Clustering Prerequisites
To construct a two-hub Server 2012 failover group, you require two frameworks running either the Datacenter or Standard version of Server 2012. They can be physical frameworks or virtual machines (VMs). You can make bunches with VM hubs utilizing either Microsoft Hyper-V or VMware vSphere. I'll be making the group utilizing two physical servers, however the bunch arrangement steps are same paying little respect to whether the group hubs are physical or virtual. In any case, a key point is that the hubs ought to be comparably arranged to empower the reinforcement hub to handle the workloads that may should be bolstered in the case of a failover or live movement. You can see the diagram of the segments I utilized for my Server 2012 failover bunch in Figure 1.

A Server 2012 failover cluster requires shared storage, which can be an iSCSI, Serially Attached SCSI, or Fibre Channel SAN. In this example, I'm using an iSCSI SAN. When using this type of storage, you need to be aware of the following:
Every server must be furnished with no less than three NICs: one NIC committed to iSCSI stockpiling availability, one NIC devoted for bunch hub correspondence, and one NIC for outer system associations. In case you're wanting to utilize the group for live movement, you ought to think about having as a fourth NIC devoted to it. Be that as it may, live movement can likewise happen over the outer system association—it'll simply be slower. In case you're utilizing your servers for Hyper-V virtualization and server solidification, you'll certainly need extra NICs to handle the VMs' system activity.
Quicker is constantly better with systems administration, so the iSCSI association ought to be running at least 1GHz.
The iSCSI target must backing the iSCSI-3 particulars, which incorporate the capacity to make determined reservations. This is required by live movement. The iSCSI 3 standard is bolstered by all equipment stockpiling merchants. In case you're attempting to execute a group in an economical lab environment, you ought to ensure the iSCSI target programming you're utilizing bolsters iSCSI 3 and steady reservations. More established forms of Openfiler didn't bolster this standard, however the new form of Openfiler with the Advanced iSCSI Target Plugin supports it. Also, StarWind Software's StarWind iSCSI SAN Free Edition is completely perfect with Hyper-V and live relocation. Certain forms of Windows Server can likewise go about as an iSCSI focus on that is perfect with the iSCSI 3 models. Server 2012 incorporates an iSCSI target. Windows Storage Server 2008 R2 incorporates support for iSCSI target programming. In addition, download Microsoft iSCSI Software Target 3.3, which keeps running on Windows Server 2008 R2.
Adding the Failover Clustering Feature
The first step in creating a two-node Server 2012 failover cluster is to add the Failover Clustering feature using Server Manager. Server Manager automatically opens when you log on to Server 2012. To add the Failover Clustering feature, select Local Server and scroll down to the ROLES AND FEATURES section. From the TASKS drop-down list, select Add Roles and Features, as shown in Figure 2. This will start the Add Roles and Features wizard.

The wizard opens with the Before you start welcome page. Click Next to go to the Select establishment sort page, which essentially inquires as to whether you're introducing an element on the neighborhood PC or introducing an element to a Remote Desktop administration. For this case, select the Role-based or highlight based establishment alternative and snap Next.
On the Select destination server page, select the server on which you need to introduce the Failover Clustering highlight. For my situation, it was a neighborhood server named WS2012-N1. In the wake of selecting your neighborhood server, click Next to go to the Select server parts page. For this sample, you won't be introducing a server part, so click Next. Then again, you can tap the Features join in the left menu.
On the Select elements page, look through the Features list until you see Failover Clustering. When you tap the case before Failover Clustering, the wizard shows a dialog box posting all the diverse segments that will be introduced as a major aspect of this component. As should be obvious in Figure 3, the wizard will introduce the Failover Cluster Management Tools and the Failover Cluster Module for Windows PowerShell as a matter of course. Click the Add Features catch to come back to the Select elements page. Click Next.

The Confirm establishment determinations page will list the Failover Clustering highlight alongside the administration apparatuses and PowerShell module. This page allows you to backpedal and roll out any improvements if necessary. Tapping the Install catch will start the genuine component establishment. After the establishment finishes, the wizard will end and Failover Clustering will be shown in the ROLES AND FEATURES segment of Server Manager. This procedure must be finished on both hubs.
Validating the Failover Clustering
In the wake of including the Failover Clustering highlight, the following step is to accept the design of the earth in which you'll make your group. To do this, you can utilize the Validate a Configuration wizard in Failover Cluster Manager. This wizard checks the equipment and programming setup of all the bunch hubs and reports on any issues that may keep the group from being made.
To open Failover Cluster Manager, select the Failover Cluster Manager alternative on the Tools menu in Server Manager. In the Management sheet, tap the Validate Configuration join appeared in Figure 4 to run the Validate a Configuration wizard.

The wizard first shows an appreciated page. Click by go to the Select Servers or a Cluster page. On this page, enter the names of the group hubs that you need to approve. I entered WS2012-N1 and WS2012-N2. Click Next to show the Testing Options page, where you can choose the tests that you need to run. You have the alternative to choose particular arrangements of tests or to run every one of the tests. For in any event the first occasion when, I prescribe that you select the alternative to run every one of the tests. Click Next to go to the Confirmation page, which demonstrates the tests that will be run. Click Next to begin the group approval testing process. The tests will check the OS level, system arrangement, and capacity of all the bunch hubs. A rundown of the outcomes are shown when the test is done.
On the off chance that the approval tests succeed, you can make the group. Figure 5 demonstrates the Summary screen for an effectively accepted group. In the event that blunders are experienced amid the approval tests, the acceptance report will show a yellow triangle for notice mistakes and a red X for extreme blunders. Cautioning blunders ought to be looked into, however they can be disregarded. Serious blunders must be remedied before the group can be made.

Creating the Failover Cluster
As of right now, you can make the bunch on any of the group hubs. I made the bunch on the principal hub (WS2012-N1). To make another bunch, select the Create Cluster connection in either the Management sheet or Actions sheet, as Figure 6 appears.

This will start the Create Cluster wizard, which begins with a welcome page. Click Next to go to the Select Servers page shown in Figure 7. On this page, enter the names of all the cluster nodes, then click Next.

On the Access Point for Administering the Cluster page, you indicate your bunch's name and IP address, both of which should be remarkable in the system. In Figure 8, you can see that I named my group WS2012-CL01 and gave it an IP location of 192.168.100.200. With Server 2012, you can have the IP location of the group allocated by DHCP, however I want to utilize a statically doled out IP address for my server frameworks.

After you enter the name and IP address, click Next to show the Confirmation page appeared in Figure 9. This page gives you a chance to verify your bunch creation decisions. If necessary, you can page back and roll out improvements.

Clicking Next on the Confirmation page makes the group on the greater part of the chose bunched hubs. An advancement page is shown as the Create Cluster wizard experiences the progressions of making another bunch. When it completes, the wizard will show a Summary page that demonstrates the design of the new group.
Despite the fact that the Create Cluster wizard will consequently choose the capacity for your majority, it frequently doesn't pick the majority drive that you need. To check which circle is being utilized by the majority, open the Failover Cluster Manager and extend the bunch. At that point grow the Storage hub and snap the Disks hub. The plates accessible to the bunch will be shown in the Disks sheet. The plate that the wizard chose for the group majority will be recorded under Disk Witness in Quorum.
In my illustration, I utilized Cluster Disk 4 for the majority. It was estimated at 520MB, which is marginally bigger than the majority least of 512MB. In the event that you need to utilize an alternate circle as the bunch majority, you can change the majority design by right-tapping the name of the group in Failover Cluster Manager, selecting More Actions, and picking Configure Cluster Quorum Settings. This will show the Select Quorum Configuration wizard, which will give you a chance to change the bunch majority.
Configuring Cluster Shared Volumes and the VM Role
Both hubs in my bunch have the Hyper-V part introduced on the grounds that I need to utilize the group for high-accessibility VMs supporting live relocation. To help with live movement, the following step is to design Cluster Shared Volumes (CSVs). Not at all like Server 2008 R2 CSVs, Server 2012 CSVs are empowered as a matter of course. Notwithstanding, regardless you have to tell the bunch which stockpiling ought to be utilized for the CSVs. To empower a CSV on an accessible circle, grow the Storage hub and select the Disks hub. Next, select the group plate that you need to use as a CSV and snap the Add to Cluster Shared Volumes join in the Failover Cluster Manager's Actions sheet, as you find in Figure 10. That bunch plate's Assigned To handle will then change from Available Storage to Cluster Shared Volume, as appeared in Figure 10.

Behind the scenes, Failover Cluster Manager configures the cluster disk's storage for CSV, which includes adding a mount point in the system drive. In my example, I enabled CSVs on both Cluster Disk 1 and Cluster Disk 3, which added the following mount points:
· C:\ClusterStorage\Volume1
· C:\ClusterStorage\Volume2
At this point, the two-node Server 2012 cluster has been built and CSVs have been enabled. Next, you can install clustered applications or add roles to the cluster. In my case, I'm building the cluster for virtualization support, so my next step is to add the Virtual Machine role to the cluster.
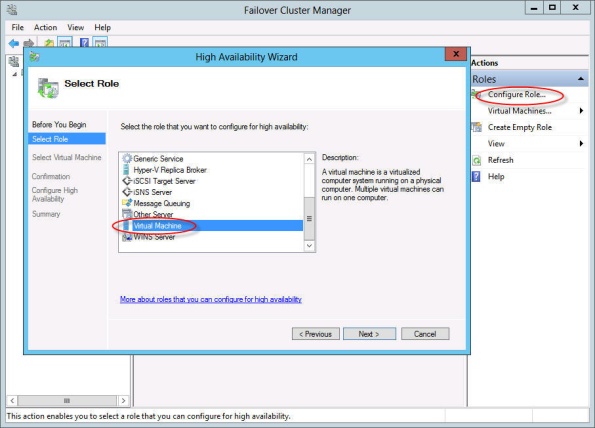
To add a new role, select the cluster name in Failover Cluster Manager's navigation pane and click the Configure Roles link in the Actions pane to launch the High Availability wizard. Click Next on the welcome page to go to the Select Role page. Scroll through the list of roles until you see the Virtual Machine role, as you see in Figure 11. Select that role and click Next.
On the Select Virtual Machine page, all the VMs on all the bunch hubs will be recorded, as appeared in Figure 12. Look through the rundown and select the VMs that you need to be profoundly accessible. Click Next. In the wake of affirming your choices, click Next to add the Virtual Machine parts to Failover Cluster Manager.

Other links you may like
Thanks for nice article!
ReplyDeleteits very usefull
ReplyDeletei loved your articles about graphics, even I have posted one blog on a grapics card : https://techgigi.com/samsung-made-fighter-jet-smartphone-tv/ . hope you will like my info too...
ReplyDeleteyou are my inspration, keep about keep updating your blogs ....